
Today I’m going to show you a way to get faster easier results.
With this technique you should be able to get all of your Ogres and Units painted and on the table in just a few hours.

Since this is going to be a red Ogre I’ve started with a Tamiya Italian Red undercoat.
The Secondary Batteries are being painted separately so I can easily reach details they would probably get in the way of. They are left attached to the sprue during painting.

The next few steps will involve drybrushing.
Because this process can be rough on your brush, you might want to start with an older one. The one above started its life as an undercoating brush, and it still works just fine for that. The bristles look as wrecked as they do because I’ve been drybrushing with it for years. I don’t know what I’ll do if I ever have to replace it.
It’s called drybrushing for a reason. You want that paintbrush to be almost completely dry. Dab a bit of paint on the tip of your brush. Have a cloth rag ready. I have some old white t-shirts I use. 100% cotton is best. Wipe the brush on that rag until nearly all the paint is gone. The brush above is covered in paint, ready to drybrush. I usually drag it across the back of my hand a couple of times to see if its dry enough to be used on the miniature yet. If the paint goes on my skin without filling in any tiny wrinkles, the brush should be good to go.

Here I’ve drybrushed Khador Red Base (this is a Formula P3 color) all over the basecoat. You can’t really tell the difference between this and the previous image. Really it just looks a bit less glossy. The paint foundation will help the wash on the next step adhere a little better.

And here is that wash step. It’s GW’s Agrax Earth. You may need to do a couple of coats.

Now it’s time for another drybrushing step. The same Khador Red Base is drybrushed on again on top of the previous step. While drybrushing is a faster technique, you still need to spend enough time on it to get proper results. This means several “coats” of the same color one on top the other. Keep at it until enough dark ink has been covered that it looks nice and red again.
The next step is to mix some Ryn Flesh with some of the Khador Red Base and drybrush on this new lighter color. It should take fewer coats as you use lighter and lighter colors. Also, try to get the brush even dryer than the previous step.

The last step is pure Ryn Flesh. Makes sure the brush is really really dry for this final step. If you do it right you can get nearly all the lines to stand out.

Next I’m adding in a few details. Any areas that will be be metallic get a basecoat of Greatcoat Gray.

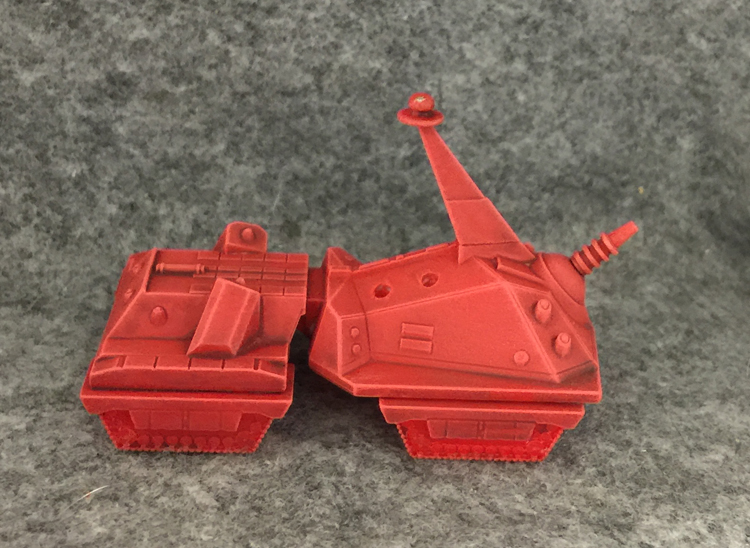
And that brings us back to our header shot. The Greatcoat Gray areas have been painted over with Cold Steel. A few other spots have been painted Sulfuric Yellow. They’d probably look a little better with a second or even third coat, but the idea here is specifically to show a quicker paint job.

Here are some units painted with the same colors. The base of the Howitzer had another step after the Chainmail: I washed it with Nuln Oil (GW again) to help the individual squares stand out.

Here I’ve used the same technique with a different color scheme. I started with a Frostbite Basecoat that was washed with Drakenhof Nightshade with just a bit of Nuln Oil mixed in. Next it was drybrushed with Frostbite then drybrushed again with Morrow White. The metal was treated the same as our previous Ogre but a Nuln Oil ink wash step was added afterword. You can see how it helps the detail pop.
A great thing about white is you can use an ink wash in one area to get an entirely new color while allowing a lot of detail to show through. This is what I did with the Missile Housings on the back. The ink was the same Guilliman Blue I had used on the model earlier. Then I added a few details with Sulfuric Yellow and Khador Red Base.
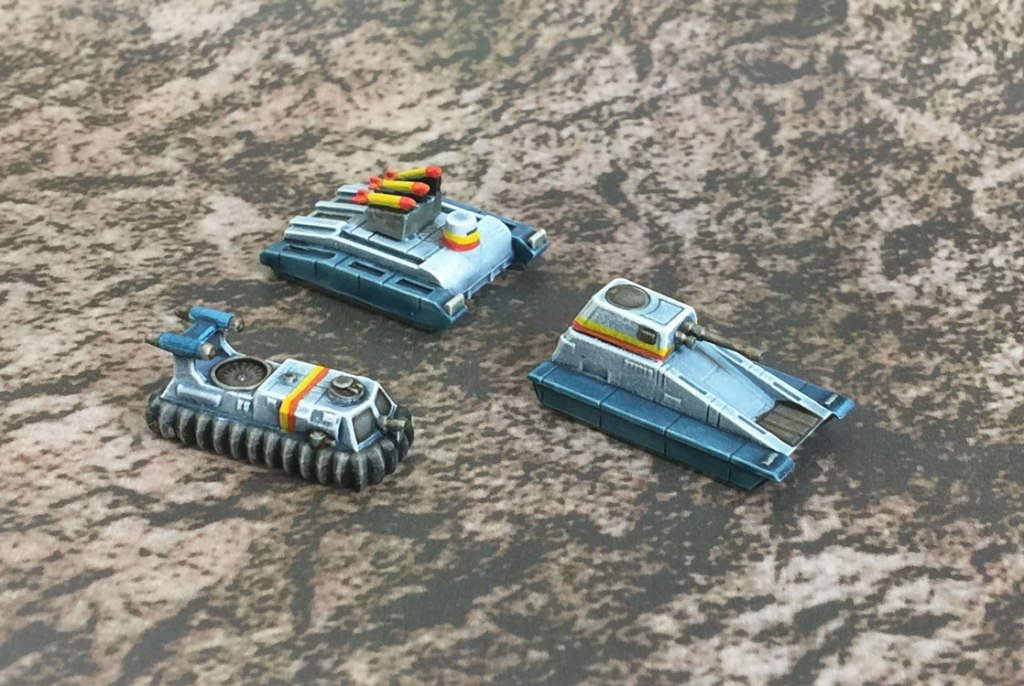
And here are some more little buddies in the same scheme. I spent just a little more time on these than the red ones, and I think the extra attention shows.

Here are all the colors used on the red models.

And all the colors for the light blue models.
~ Hope you enjoyed the article. I have a couple coming up for Ogre on some camo schemes.

It’d be really helpful to have a list of paint colors used at the bottom.
Good work. I never really got the hang of dry-brushing, so all my models are pretty crummy.
LikeLiked by 1 person
I added pictures of the ones I used.
LikeLike
It looks line the primary batteries don’t have a lot of contrast on the red model, the blue looks a lot better. Is this just lighting? if not, should one you consider starting with a basecoat of black on the MB’s to allow the details to pop a little more?
LikeLike
The metal on the blue got an ink wash. I left it off the red ogre’s weapons just to show what it looks like without that extra step. Black usually makes a good basecoat for metal so that’s definitely something to try.
LikeLike
“Here I’ve drybrushed Khador Red Base (this is a Formula P3 color) all over the basecoat. You can’t really tell the difference between this and the previous image.” Actually, I CAN see the difference. That first dry-brush really makes the detail on the model stand out, especially the side panels near the secondary batteries. Good job.
I’ve always been a fan of base-coat / dry-brush / ink wash and repeat. Like you’ve demonstrated above, this is a very quick way to field an entire army that looks really good on the table. I’d just like to add either spray painting or air-brushing your base coat on is another way to save time and improve the basic look of the model. Also, spray over-coating with a flat overcoat is a good way to both get rid of any remaining “shiny-ness” of the final wash and protect your model’s paint job from normal handling during games.
After yellow, red has always been a hard color to work with (at least for me) but your “quickie” models are terrific. I’ll confess that I like the blue/white scheme better, but that’s just personal preference. I’ve REALLY got to get some of the photos from my old site onto a blog. I’d love your opinion of my paint jobs.
LikeLike